Friday, April 22, 2011

Easter Tradition: Chocolate Eggs and Colomba

The Viani Bar in Morlupo, just north of Rome, not only has wonderful breakfast pastries, great sandwiches and home-made ice cream. It also prides itself on always having fabulous decorations and edible gifts for every holiday. I had lunch there today and was mesmerized by the gorgeous Easter eggs and Colomba (traditional Italian Easter cake) they had on display.

The Easter eggs are wrapped in colorful metallic wrapping paper. Each egg is filled with a surprise, usually a small toy, key chain or piece of jewelry. Some of the more expensive Easter eggs on sale contain more elaborate gifts.


The nicest packages by far on sale at Viani are the Colomba. The traditional Easter Colomba, like the one below (the Colomba "classica") is a sweet yeast bread filled with candied orange and topped with whole almonds and sugar. It's beautifully packaged in a box covered with artificial flowers so pretty that they almost seem real.

The pasticceria that produces this Colomba, and distributes throughout Italy, is Flamigni Pasticceria. The company is located in Forli' in the Emilia Romagna region and has been owned and operated by the three Flamigni brothers since 1930.


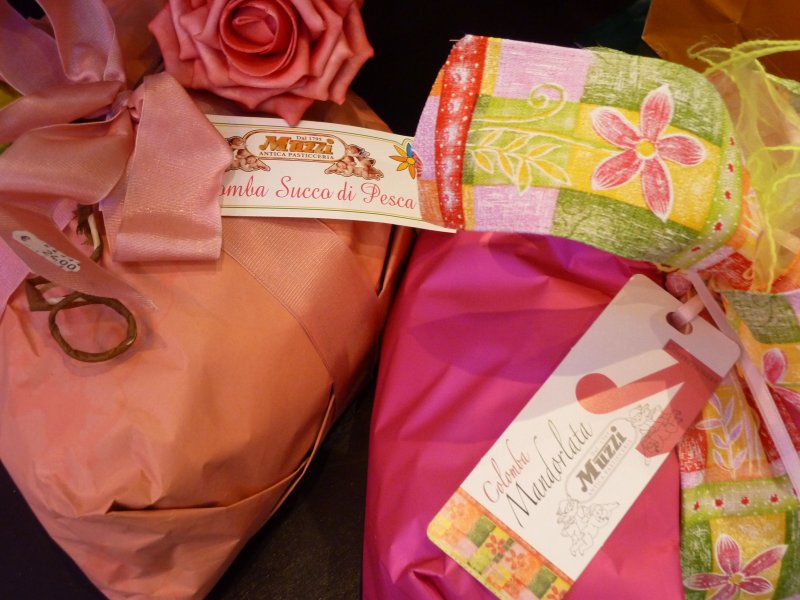
Another Colomba producer is Pasticceria Muzzi, located in Foligno. Muzzi is a much older company than Flamigni and dates back to the late 1700's.
These two beautifully packaged Colomba vary from the standard recipe: one is peach flavored and the other is filled with almonds.


This Colomba, again featuring a beautiful artificial flower on a violet package with pink & green ribbon, is made with wild berries. The price for the Colomba is about four times what you would pay for a standard Colomba in an alimentari or grocery store. The price is for the lovely and unique packaging, but if you want to give someone a Colomba as a gift these are exquisite.


My favorite is this ladybug package. I love the red and white polka dot paper, the wooden ladybug attached to the package, complemented by red and white flowers.


I also like this Colomba in it's pretty orange and brown basket with orange ribbon and decorated with artificial oranges.


Almost every pasticceria in Italy produces Colomba at Easter-time and most have beautifully packaging. So if you will be an Easter lunch guest in an Italian home this is the perfect gift to bring!

Wednesday, April 20, 2011

Italian "Colomba" Easter Cake French Toast


I can't say that the traditional Italian Colomba Easter cake strikes much of a chord with me although Italians go crazy for it. I've come to enjoy the Colomba, but only because I now think of it as more of a sweet bread than a cake.

There is, however, one way to serve Colomba that is exquisite: as French toast. It's incredibly moist and as the bread is sweet to begin with it barely even needs butter and syrup. The Colomba is filled with candied bits of orange and coated with whole almonds and sugar which adds to the flavor. I slice it into one inch slices as otherwise the slices fall apart when dipped into the egg mixture.


Prepare a mixture of a few eggs and a cup or more of milk, according to taste, and whisk until well blended. Lightly oil a pan with extra virgin olive oil, and once the pan is hot dip the bread slices into the egg mixture and pan fry on both sides until golden brown.


Place the slices on a platter and serve as is or lightly dusted with powdered sugar.


All the same, I can never resist adding melted butter and maple syrup or honey for an extra special Easter breakfast treat!

Saturday, March 26, 2011

Food Fairies


I wanted my husband's double surprise birthday celebration to be fabulous (it was a big one!, no numbers mentioned, but it was a big one!) and, looking back on it, my daughter and I not only managed to surprise Maurizio two days in a row but both parties exceeded all our expectations.
Food, of course, is always key. And the dessert should be the crowning glory of the meal....especially if it's a birthday.
Our elegant Saturday night party featured a luscious dark chocolate espresso cupcake tower. Each cupcake had a slightly different look, mostly garnished with berries. The top of the tower was a small chocolate cake decorated with chocolate espresso candy nuggets. The chocolate was so rich that with fifty guests we finished the cupcakes and only just made a dent in the cake itself. For the entire following week we were able to keep ourselves in chocolate.....just where I like to be.


Our Sunday party required another birthday cake, this one a richly dense carrot cake with a cream cheese & lemon curd icing. No raisins, but plenty of walnuts. At first glance the cake didn't seem like it could possibly suffice for our group of sixty but it did. When I carried the cake into our salotto, I could feel just by it's weight that it would be plenty. And what flavor and richness!


My Food Fairy, Sara, provided me with several very clever cake cutting designs which help you cut perfect pieces to serve a large group. Thankfully one of our guests took the cake cutting into hand.
The delightful Sara and her Food Fairy partner do catering, food events and, of course, amazing cakes for everything from weddings to casual birthday parties. Contact them at foodfairiesroma@gmail.com or check out their blog: www.foodfairiesroma.blogspot.com.

Sunday, February 27, 2011

It's mostly about the butter


Hot, buttery scones. That's what came to me this morning when, after a series of gorgeous, sunshine filled days, I looked out my kitchen window to see a gray, rainy Sunday.
Scones have to be the biggest bang for your buck if you want a hot, melt in your mouth breakfast in just a half an hour. Made with simple, always on-hand ingredients, effortless and quick to make, but oh what a result!
My favorite scone recipe is adapted from Maryana Vollstedt's The Big Book of Breakfast, my bible of sorts at our bed & breakfast.
I tried to use the scones and butter & honey to lure my husband into spending a lazy day with me reading in bed. He ate them happily, snuggled under the covers, and then went out into the bad weather. It worked for me though. I'm still here in bed reading and working.


So let's get started. First, preheat your oven to 425°F (200°C).

Here's what you need:

2 cups (240 g) flour
1 tbsp (10 g) baking powder
1/2 cup (50 g) sugar
1/2 tsp (2 g) salt
1/2 cup (113 g) cold butter, cubed
1 large egg
1/2 cup (118 ml) cream

Before we move on, a note on the cream. This is not a recipe to try to cut calories on: just go and use a nice, thick cream. And another thing: don't throw out any cream you have in the fridge that is going sour. It's great, perhaps even better, for this recipe. If you don't have cream a perfect substitute is Greek yogurt, or any other plain yogurt. Or fresh, creamy ricotta. And again, yogurt and ricotta that seems to have gone off and no longer suitable for eating as is, is perfect for the scones.
1. Put all your dry ingredients into a bowl and stir them with a fork.
Note: If you use a scale, as I do, this is made infinitely easier. Place your bowl on the scale and set the tare weight, in other words, bring your scale back to zero. Do this after you add each dry ingredient (and the butter) into the bowl. What's the point of all this? You only have one dirty bowl to clean, and weighing ingredients is much more accurate.


2. Cut the cold, cubed butter into the flour mixture. A simple tool, like this one, makes cutting the butter into the flour much simpler. In its absence use a dinner knife.


You want to cut in the butter until your mixture is crumbly, with pea-sized lumps.


3. Add the egg and cream (or yogurt, ricotta) to the flour mixture.
4. Gently whisk the cream and egg together (right there in the bowl with the flour), then
5. Stir the egg & cream into the dry ingredients just until they're moist. No longer.


This is what it should look like:


6. At this point dump the mixture onto a lightly floured surface.
7. Knead, ever so gently, just until you form a ball that (mostly) sticks together. Remember: you want to keep it crumbly.


8. Then pat the dough down into a circle. If, as I do, you like scones thick don't pat the dough any thinner than 1/4 inch high.
9. Use a floured knife to cut the dough into triangles.
If you prefer different shapes feel free to use cookie cutters or a knife to cut any shape you want.


10. Gently place the scones on an ungreased cookie sheet, leaving a little space between them. They need a little room to rise in the oven.


11. Bake until golden brown, about 10 to 15 minutes.


12. Serve warm with butter, honey or jam.
Scones are not just for breakfast: they're wonderful with ham and cheese, salad or just about anything savory that strikes your fancy.


Back to the weighing versus cup measurement approach. When you use a scale this is all you're left with to clean up. No unnecessary pile of cups, teaspoons & tablespoons. I'm all for easy....


A few tips on cleaning up your work surface.
Step one: use a scraper to scrape down the work surface. If you don't have one, it's a good investment. In the meantime, the side of a metal spatula will do just fine.


Step two: Use a whisk broom to gather up all the flour particles you've just scraped down. Ooooh, you might say, not my dirty whisk broom. True. I have one that I only use on kitchen & dining surfaces to gather up flour, crumbs and the like.
At this point your work surface is basically clean and a quick wipe over with a damp sponge will do the finishing touches.


And the flour that inevitably ends up on the floor? You can get out your broom and sweep it up.
Or if, like I do, you have a lovable chocolate lab she'll be ready and willing to lick up every last particle that touches the floor.


Sunday, February 20, 2011

My market variety mandolin

I recently was looking at Amy Fothergill's post on the most essential tools needed in the kitchen. One item I would add to this list is a mandolin. The mandolin I use was purchased by my sister-in-law a decade ago when she was out doing her Saturday morning vegetable shopping at her local open air market. As you can see this is a bare bones, simple mandolin but it works like a charm.
I remember seeing this kind of mandolin advertised on television years and years ago. I think back then it was called something like a Magic Slicer. The person in the ad was slicing vegetables with such rapidity that as a child it seemed impossible. Well, it does in fact work just that well. It slices so fast, simply by passing the vegetable rapidly across the blade, that vegetables are sliced (perfectly I might add) in a matter of seconds. But be careful: once the vegetable you are slicing gets so short that your fingers are dangerously close to the blade, spear the remaining piece of vegetable onto its holder to complete the slicing process.
I love this mandolin so much that I've since purchased two fancier models with bells and whistles that allow different slicing thicknesses and shapes. I hardly ever use them though as it's more trouble to get them out and set them up than it's worth. The great thing about my market variety mandolin is that it slices vegetables super thin and perfectly uniform.
I use the mandolin when we make pizza to thinly slice up all kinds of vegetables for the toppings. As the pizzas cook in 3 to 4 minutes the vegetables need to be sliced paper thin so they cook thoroughly in a short period of time. And this mandolin is also perfect for slicing potatoes for french fries. What the mandolin does not work well for are very soft (and juicy) fruits and vegetables like tomatoes.


Frequently I roast fish fillets in the oven topped with a thin layer of potatoes and drizzled with olive oil. The potatoes come out crunchy and golden. I also slice up other vegetables, like zucchini, to roast with the fish.


Friday, December 17, 2010

A Visit to Preferred Meats with the San Francisco Professional Food Society


Ugandan born Bala Kironde, with his soft spoken elegance, provided members of the San Francisco Professional Food Society with an outstanding tour of his company, Preferred Meats. Bala Kironde’s father was a Ugandan diplomat turned farmer. On his extensive property holdings a vast assortment of fowl were raised. One of 16 children, Bala Kironde completed his university studies in England with the full intention of returning to Uganda to take over the management of his father’s farm. Mr. Kironde’s graduation coincided with the political upheaval in Uganda under the dictatorship of Ida Amin in the 1970’s, and Mr. Kironde’s father lost most of his farmland holdings.

A lucky break put Mr. Kironde in touch with a Californian entrepreneur who offered him a job in California where he has since made his home. Bala Kironde’s path from his arrival in California to making Preferred Meats the company it is today has been a long one from raising chickens hands-on to becoming a wholesaler of some of the most outstanding meat available in the Bay Area.


Mr. Kironde has wisely employed John Paul Khoury, CCC as his Corporate Chef. John Paul is on the front line interfacing with chefs and other culinary professionals from the restaurants that form the base of Preferred Meat’s clientele. Chef Khoury prepared a sampling of meats for us to try including two types of pork, lamb and maigret de canard. Each sample was better than the next and confirmed why Preferred Meats is the top company of its kind in the Bay area.


Although Preferred Meat products are not necessarily certifiably organic, sustainable or grass-fed they are close to it. Bala Kironde purchases from a group of hand-picked small to medium sized top notch farmers he knows and has visited personally. Product is mostly local, but some comes from as far away as Texas and Uruguay. Preferred Meat’s products are many and varied ranging from chicken, beef and lamb to exotic fowl, foie gras and goat.